
How to Change a Tire Without Electricity: The Pneumatic Advantage
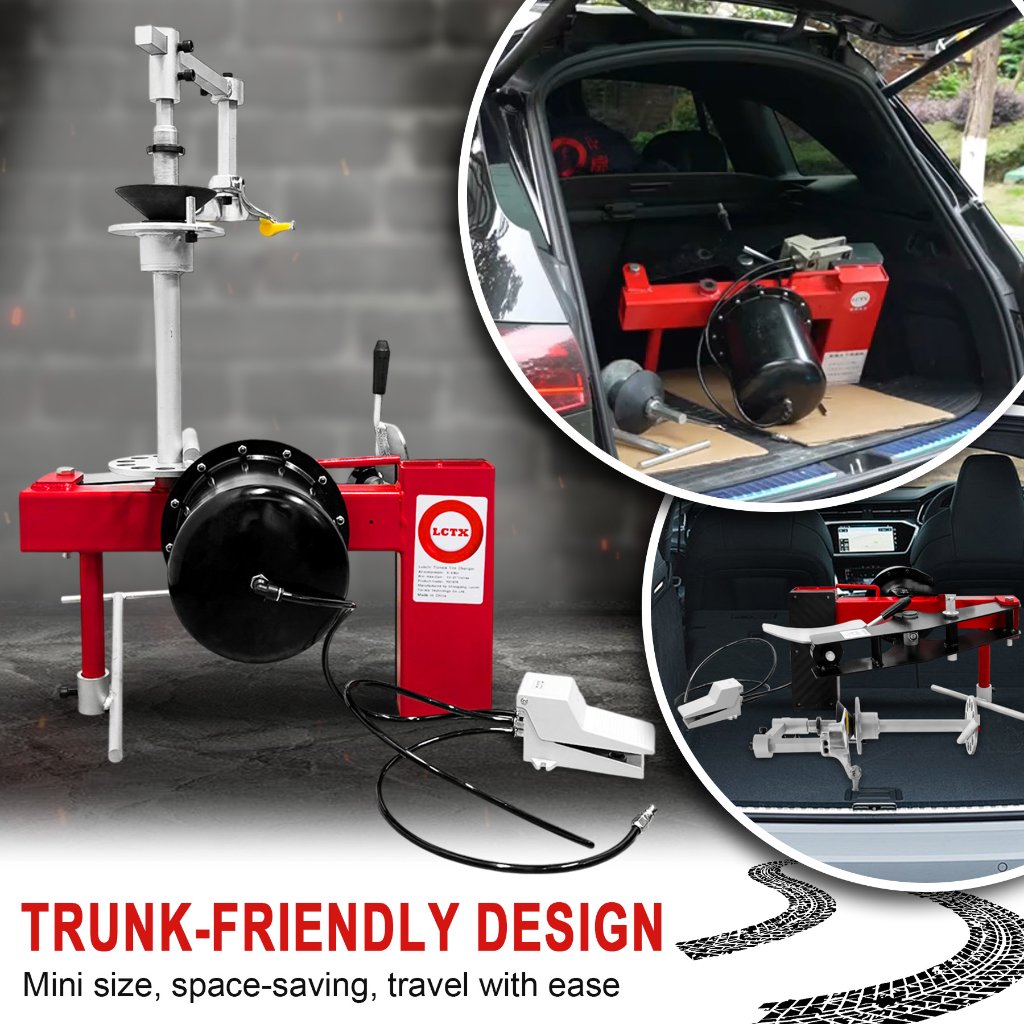
How to Change a Tire Without Electricity: The Pneumatic Advantage
Stuck on the roadside with no power outlet? Need to change tires in remote locations? Air-powered (pneumatic) tire changers are the solution professional mobile mechanics rely on.
Why Choose Pneumatic Over Electric?

The Power Problem
Traditional electric tire changers face major limitations:
- Require 110V or 220V power outlet
- Not practical for roadside service
- Limited to garage locations
- Expensive electrical installation
- Power outages shut down operation
The Pneumatic Solution
Air-powered tire changers like the LCTX use compressed air to generate:
- 2 tons of torque for bead breaking
- Smooth, controlled operation
- Consistent power anywhere
- No electrical hazards
- Weather-resistant operation
How Pneumatic Tire Changers Work
The Science Behind Air Power
Compressed air systems convert air pressure into mechanical force:
- Air Compressor generates 8-10 Bar pressure
- Pneumatic Cylinder converts pressure to linear force
- Lever Arm multiplies force for bead breaking
- Rotating Table uses air motor for smooth turning
Result: 2 tons of controlled force from portable equipment weighing just 80 lbs!
Key Components

Duck Head Bead Breaker:
- Pneumatic cylinder-powered
- Adjustable positioning
- Prevents rim damage
- Handles stubborn beads
Turntable System:
- Air motor driven
- Smooth rotation
- Adjustable speed
- Precise control
Mounting/Demounting Tool:
- Leverage-based design
- Tire-friendly operation
- Multiple mounting points
- Professional results
Step-by-Step: Changing Tires Without Electricity
Equipment Needed:

✅ LCTX Pneumatic Tire Changer ✅ Air Compressor (8 Bar, 8-10 gallon) ✅ Tire lubricant ✅ Valve core removal tool ✅ Tire pressure gauge ✅ Safety glasses ✅ Work gloves
Preparation (5 minutes)
Step 1: Set Up Equipment
- Position tire changer on level ground
- Connect air compressor hose
- Ensure 8 Bar (116 PSI) pressure
- Test pneumatic controls
Step 2: Remove Wheel from Vehicle
- Loosen lug nuts before jacking
- Use proper jack points
- Remove wheel completely
- Inspect for damage
Step 3: Deflate Tire
- Remove valve core completely
- Let air escape fully
- Push tire bead to center of rim
- Apply tire lubricant to beads
Tire Removal (8-12 minutes)
Step 4: Break the Bead
- Position wheel on turntable
- Activate pneumatic bead breaker
- Lower duck head onto tire sidewall
- Apply pressure gradually
- Move around tire circumference
- Repeat for other side
Pro Tips:
- Work in 90-degree increments
- Apply consistent pressure
- Listen for "pop" of bead releasing
- Use lubricant liberally
Step 5: Remove First Bead
- Position demounting tool
- Press tire down into rim drop center
- Use leverage to lift bead over rim
- Work around circumference
- First bead comes off completely
Step 6: Remove Second Bead
- Flip tire over
- Push second bead into drop center
- Use tool to lift over rim edge
- Extract tire completely
- Inspect rim for damage
Tire Installation (8-12 minutes)

Step 7: Mount New/Repaired Tire
- Apply generous tire lubricant
- Position new tire on rim
- Push first bead over rim edge
- Use mounting tool for assistance
- Ensure bead seats in drop center
Step 8: Mount Second Bead
- Rotate turntable slowly
- Use mounting tool to guide bead
- Work gradually around tire
- Ensure even bead seating
- Check for twists or pinches
Step 9: Inflate and Seat Beads
- Install valve core
- Inflate to 40 PSI quickly
- Listen/watch for both beads to "pop"
- Reduce to recommended pressure
- Check for leaks with soapy water
Step 10: Final Inspection
- Check bead seating all around
- Verify tire pressure
- Inspect for damage
- Clean tire/rim
- Reinstall on vehicle
Advantages of Pneumatic System
Portability
- No electrical cord to limit movement
- Set up anywhere with air supply
- Perfect for mobile service trucks
- Roadside emergency capability
- Remote location service
Power
- 2 tons of controlled force
- Handles stuck beads easily
- Consistent performance
- No voltage drops
- Weather-independent
Cost Efficiency
- Lower initial investment
- No electrical installation
- Minimal maintenance
- Long service life
- Lower operating costs
Safety
- No electrical shock risk
- No exposed wiring
- Safer in wet conditions
- Controlled operation
- Emergency stop capability
Air Compressor Requirements
Minimum Specifications:
Pressure: 8 Bar (116 PSI) minimum Tank Size: 8-10.5 gallons CFM: 4-6 CFM recommended Type: Portable or stationary
Recommended Compressors:
Portable Options:
- 8-gallon pancake compressor
- 10-gallon wheeled compressor
- Easy to transport
- $150-300 price range
Stationary Options:
- 20-30 gallon tank
- Higher CFM output
- Faster recovery time
- $300-600 price range
Pro Mobile Setup:
- Truck-mounted compressor
- Always available
- Powers multiple tools
- Best for full-time mobile service
Compressor Maintenance:
- Drain tank weekly
- Check oil monthly
- Replace air filter quarterly
- Inspect hoses for wear
- Test pressure regulator
Common Scenarios Where Pneumatic Excels
1. Roadside Emergency Service
Challenge: Flat tire on highway Solution: LCTX + portable compressor Time: 20-30 minutes Revenue: $75-150 per call
2. Rural/Remote Locations
Challenge: Farm equipment, no power available Solution: Generator-powered compressor + LCTX Advantage: Service customers others can't reach
3. Mobile Tire Service Business
Challenge: Multiple locations daily Solution: Truck-mounted system Efficiency: 8-12 tire changes per day
4. Construction Sites
Challenge: Heavy equipment tires, no garage Solution: Pneumatic changer on-site Benefit: Minimize equipment downtime
5. Race Track Support
Challenge: Quick tire changes at events Solution: Fast pneumatic operation Speed: 15 minutes per complete change
Troubleshooting Common Issues
Problem: Bead Won't Break
Causes:
- Insufficient air pressure
- Corroded rim
- Old, dry tire
Solutions:
- Increase compressor pressure to 8-10 Bar
- Apply penetrating oil to bead
- Let sit 30 minutes, try again
- Use additional leverage
Problem: Bead Won't Seat
Causes:
- Not enough air volume
- Tire not in drop center
- Valve core restricting flow
Solutions:
- Remove valve core temporarily
- Use high-volume inflation
- Ensure tire is fully in drop center
- Bounce tire while inflating
Problem: Tire Leaking Air
Causes:
- Bead not fully seated
- Damaged rim
- Valve issue
Solutions:
- Deflate and remount
- Check rim for dents
- Replace valve core/stem
- Apply bead sealer if needed
Problem: Compressor Can't Keep Up
Causes:
- Tank too small
- CFM insufficient
- Air leaks in system
Solutions:
- Upgrade to larger compressor
- Check all connections for leaks
- Use tank reserve between operations
- Consider dual-tank system
Pro Tips for Pneumatic Tire Changing
Efficiency Boosters:
- Prep Everything First: Have tools, lubricant, valve cores ready
- Use Quality Lubricant: Makes huge difference in difficulty
- Work Methodically: Don't rush, avoid mistakes
- Let Air Compressor Recover: Between tires, let tank refill
- Keep Equipment Clean: Prolongs life, prevents issues
Time-Savers:
- Remove valve cores completely
- Apply extra lubricant
- Use proper leverage
- Position tools correctly
- Practice on old tires
Damage Prevention:
- Never force anything
- Use plastic rim guards
- Work slowly on expensive wheels
- Check clearances constantly
- Apply even pressure
Comparison: Pneumatic vs Electric vs Manual
| Feature | Pneumatic | Electric | Manual | |---------|-----------|----------|--------| | Portability | ⭐⭐⭐⭐⭐ | ⭐⭐ | ⭐⭐⭐⭐⭐ | | Power | ⭐⭐⭐⭐⭐ | ⭐⭐⭐⭐ | ⭐⭐ | | Setup Time | ⭐⭐⭐⭐ | ⭐⭐⭐ | ⭐⭐⭐⭐⭐ | | Operating Cost | ⭐⭐⭐⭐ | ⭐⭐⭐ | ⭐⭐⭐⭐⭐ | | Reliability | ⭐⭐⭐⭐⭐ | ⭐⭐⭐⭐ | ⭐⭐⭐ | | Mobile Use | ⭐⭐⭐⭐⭐ | ⭐⭐ | ⭐⭐⭐⭐ |
Business Case: Why Mobile Mechanics Choose Pneumatic
Investment Analysis:
Equipment Cost:
- LCTX Tire Changer: $599.99
- Portable Compressor: $250
- Tools & Accessories: $150
- Total Investment: $1,000
Revenue Potential:
- Tire change service: $40-60
- Average 3 jobs/day
- 5 days/week
- Monthly revenue: $2,400-3,600
ROI Timeline:
- Break-even: 8-12 tire changes
- Calendar time: 2-4 weeks
- Year 1 profit: $25,000-40,000
Competitive Advantages:
- Service Anywhere: Beat shop prices with convenience
- Lower Overhead: No shop rent or utilities
- Higher Margins: Direct to customer, no middleman
- Flexible Schedule: Work when/where you want
- Scalability: Add more equipment/staff easily
Maintenance Schedule
Daily (After Each Use):
- Wipe down equipment
- Check air connections
- Test controls
- Drain compressor tank
Weekly:
- Lubricate moving parts
- Inspect hoses
- Check for wear
- Clean thoroughly
Monthly:
- Deep clean all components
- Tighten all bolts
- Replace worn parts
- Test all functions
Annually:
- Complete overhaul
- Replace seals/gaskets
- Professional inspection
- Update service records
Safety Guidelines
Personal Protection:
- ✅ Safety glasses (mandatory)
- ✅ Work gloves
- ✅ Steel-toe boots
- ✅ Ear protection (compressor noise)
- ✅ Proper clothing (no loose items)
Equipment Safety:
- Never exceed recommended pressure
- Secure wheel before operating
- Keep hands clear of pinch points
- Use proper lifting techniques
- Have emergency shut-off accessible
Work Environment:
- Well-ventilated area
- Level, stable surface
- Adequate lighting
- Clear work zone
- Fire extinguisher nearby
Conclusion
Pneumatic tire changers like the LCTX revolutionize mobile tire service by eliminating electrical dependence. With just compressed air, you get:
✅ True portability - Work anywhere ✅ Professional power - 2 tons of force ✅ Lower investment - vs electric models ✅ Higher reliability - Fewer components to fail ✅ Weather resistance - Safe in any conditions ✅ Business flexibility - Mobile service capability
Whether you're a mobile mechanic, roadside assistance provider, or DIY enthusiast, air-powered tire changing offers the perfect combination of power and portability.
Ready to cut the cord? The LCTX Air-Powered Tire Changer brings professional tire service to any location - no electricity required.
Related Articles:
- Best Portable Tire Changers 2024
- Starting a Mobile Tire Service Business
- Air Compressor Buying Guide for Mobile Mechanics


