
DIY Tire Changing at Home: Everything You Need to Know
DIY Tire Changing at Home: Everything You Need to Know
Changing your own tires can save hundreds of dollars per year and give you independence from tire shops. Here's everything you need to know to get started.
Why Change Your Own Tires?
Cost Savings

Typical Shop Costs:
- Mounting & balancing: $20-30 per tire
- 4 tires: $80-120
- Twice per year: $160-240 annually
- 5-year savings: $800-1,200
DIY Costs:
- Equipment investment: $600-1,000 (one-time)
- Operating costs: $20-40/year
- Break-even: 5-8 tire changes (2-3 years)
Convenience

✅ No appointment scheduling ✅ No waiting rooms ✅ Work on your schedule ✅ Weekend projects ✅ Immediate tire issues ✅ Learn valuable skill
Control
✅ Know work is done right ✅ Inspect wheels/brakes yourself ✅ Choose your own tires ✅ Take your time ✅ No upselling pressure
Equipment Needed
Essential Equipment
1. Tire Changer ($250-800)
Options:
- Manual: $250-400 (budget)
- Pneumatic: $400-800 (recommended)
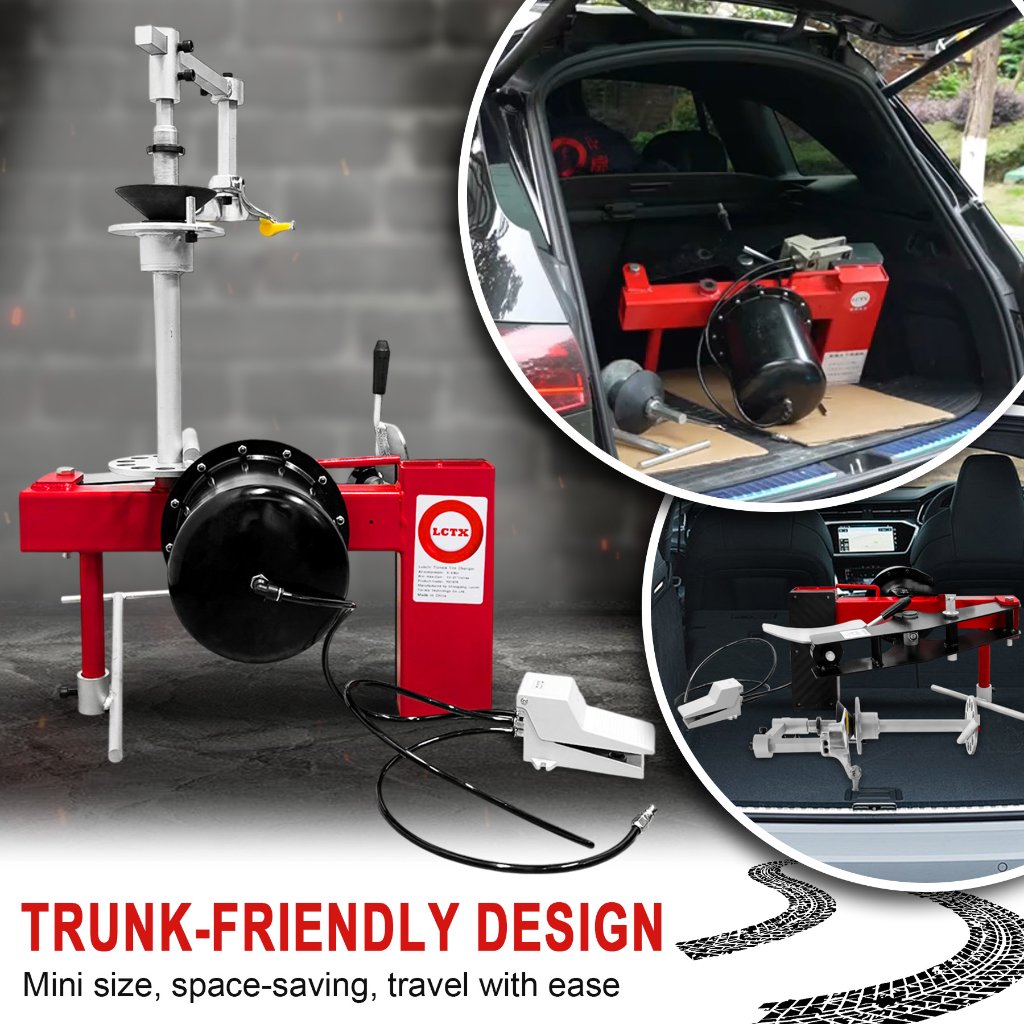
- LCTX Air-Powered: $599.99 (best value)
Why LCTX?
- Handles 12-21" tires
- Air-powered (no electricity)
- Professional results
- 80 lbs (portable)
- 2-ton force
2. Air Compressor ($200-500)
Requirements:
- 8 Bar (116 PSI) minimum
- 8-10 gallon tank
- 4-6 CFM output
Recommendations:
- Craftsman 10-gallon: $300
- DeWalt pancake 8-gallon: $250
- California Air Tools 10-gallon: $400 (quiet)
3. Wheel Balancer (Optional Year 1)
Options:
- Manual bubble balancer: $50-100
- Digital balancer: $300-600
- Professional static balancer: $800-1,500
Note: Many DIYers balance at shop ($10-15/tire) first year, buy balancer later
4. Hand Tools ($200-400)
Must-Have:
- Impact wrench (cordless): $150-250
- Torque wrench: $50-100
- Floor jack (3-ton): $80-150
- Jack stands: $50-80
- Tire pressure gauge: $15-30
- Valve tool set: $10-20
Nice-to-Have:
- Breaker bar
- Tire iron
- Bead seater (optional)
- Work gloves
- Safety glasses
5. Supplies ($100-150)
Consumables:
- Tire mounting lubricant: $15-25
- Valve stems (pack): $20-30
- Wheel weights assortment: $30-50
- Valve cores: $10
- Tire sealant: $10-15
- Clean rags: $10
Total Investment
Budget Setup: $600-800
- Manual changer
- Small compressor
- Basic tools
- Supplies
Recommended Setup: $1,000-1,500
- LCTX pneumatic changer
- Quality 10-gallon compressor
- Good tools
- Supplies
Professional Home Setup: $2,000-3,000
- LCTX changer
- Large compressor
- Wheel balancer
- Complete tool set
Space Requirements
Minimum Space:

Garage Size: 10' × 10' area Height: 7' minimum Surface: Level concrete Power: 110V outlet (for compressor)
Ideal Setup:
Garage Bay: 12' × 20' Dedicated corner: For tire changer Storage: Shelving for tools/supplies Lighting: Bright overhead lights Ventilation: Window or fan
Alternative Locations:
- Driveway (weather-dependent)
- Carport
- Workshop
- Basement (access considerations)
Step-by-Step Guide
Preparation Phase
1. Learn First (1-2 weeks)
- Watch YouTube tutorials
- Read equipment manuals
- Join online forums
- Ask experienced friends
Recommended Channels:
- ChrisFix
- South Main Auto
- 1A Auto
- Tire Review
2. Practice Setup (1 day)
- Assemble tire changer
- Test air compressor
- Organize tools
- Create work area
3. First Practice Run (2-4 hours)
Get old tires/wheels:
- Junkyard wheels: $10-20 each
- Old tires (free from shops)
- Practice mounting/dismounting
- Make mistakes on practice wheels
Practice until comfortable:
- 3-5 practice tires recommended
- Learn bead breaking
- Perfect mounting technique
- Understand lubricant use
First Real Tire Change
Timeline: 2-3 hours (first time) Future changes: 45-60 minutes
Step 1: Remove Wheel from Car (15 min)
- Park on level surface
- Engage parking brake
- Loosen lug nuts (car on ground)
- Jack up vehicle
- Place jack stands
- Remove lug nuts completely
- Remove wheel
Pro Tips:
- Loosen lug nuts before jacking
- Use proper jack points
- Never work under car on jack alone
- Mark wheel position (LF, RF, LR, RR)
Step 2: Deflate & Prepare (5 min)
- Remove valve cap
- Remove valve core (saves time)
- Let air escape completely
- Break bead from rim (push inward)
- Apply tire lubricant generously
Lubricant Application:
- Both beads (top and bottom)
- Rim edges
- Don't skimp - makes huge difference
- Let sit 2-3 minutes
Step 3: Break Bead (5-10 min)
Using LCTX Pneumatic:
- Position wheel on turntable
- Activate pneumatic bead breaker
- Lower duck head onto sidewall
- Apply gradual pressure
- Work around tire (4-6 spots)
- Flip wheel, repeat other side
Listen for "pop":
- Indicates bead releasing
- Both sides must release
- If stuck, more lubricant
- Wait 5 minutes, try again
Step 4: Remove Old Tire (10-15 min)
- Position demounting tool
- Push tire into rim center (drop zone)
- Lever first bead over rim edge
- Work around circumference
- First bead comes off
- Flip tire
- Repeat for second bead
- Remove tire completely
Common Issues:
- Tire won't slide - add lubricant
- Tool slips - reposition
- Rim damage risk - use plastic guards
- Take your time - don't force
Step 5: Inspect & Clean (5 min)
Check Rim:
- Look for dents
- Check for corrosion
- Clean rim thoroughly
- Wire brush if rusty
- Remove old weights
Inspect:
- Valve stem (replace if old)
- Rim sealing surface
- No sharp edges
- TPMS sensor (if equipped)
Step 6: Mount New Tire (15-20 min)
Check Tire Direction:
- Look for directional arrows
- "Outside" marking
- Rotation direction
- Match to rim size
Mounting Process:
- Apply generous lubricant
- Position tire on rim
- Push first bead over rim edge
- Use mounting tool carefully
- Work gradually around tire
- Ensure bead in drop center
- Mount second bead
- Check for pinches/twists
Pro Tips:
- Use A LOT of lubricant
- Keep tire centered
- Work in small sections
- Check bead position frequently
- Don't rush this step
Step 7: Inflate & Seat Beads (10-15 min)
Safety First:
- Wear safety glasses
- Stand to side (not in front)
- Use tire cage if available
- Don't exceed 40 PSI initially
Inflation Process:
- Install new valve core
- Attach air chuck
- Inflate quickly to 35-40 PSI
- Listen for both beads to "pop"
- Check bead seating visually
- Reduce to correct pressure
Bead Won't Seat:
- Remove valve core (more airflow)
- Use ratchet strap around tread
- Bounce tire while inflating
- Add more lubricant, try again
- Be patient - can take 2-3 tries
Step 8: Balance Wheel (Options)
Option A: DIY Static Balance (20-30 min)
- Bubble balancer: $50-100
- Good enough for slow speeds
- Requires practice
- Learning curve
Option B: Shop Balance ($10-15/tire)
- Take wheel to tire shop
- Quick (<10 min)
- Professional accuracy
- Recommended first year
Option C: Buy Dynamic Balancer ($300-1,500)
- Best long-term solution
- Professional results
- More space needed
- Worthwhile if doing many tires
Step 9: Reinstall on Vehicle (10-15 min)
- Clean wheel mounting surface
- Apply anti-seize to studs (light coat)
- Lift wheel onto studs
- Hand-tighten lug nuts
- Lower car (still on jack stands)
- Torque lug nuts to spec
- Use star pattern
- Lower completely
- Final torque check
Torque Specifications:
- Most cars: 80-100 ft-lbs
- Check owner's manual
- Use torque wrench (critical)
- Star pattern: prevents warping
Step 10: Test & Verify (5-10 min)
Before Driving:
- Check all 4 tire pressures
- Verify lug nuts tight
- Check for leaks (soapy water)
- Visual inspection
Test Drive:
- Drive slowly first (20-30 mph)
- Listen for unusual sounds
- Feel for vibrations
- Check pressures again after 20 miles
- Re-torque lug nuts after 50 miles
Common Challenges & Solutions
Challenge 1: Stuck Bead
Symptoms:
- Bead won't break
- Tire seems glued to rim
- Common on old tires
Solutions:
- Apply penetrating oil
- Wait 30 minutes
- Increase air pressure (8-10 Bar)
- Use additional leverage
- Heat tire (carefully)
- Try multiple positions
Challenge 2: Tire Won't Seat
Symptoms:
- Beads won't pop
- Air leaking around bead
- Tire inflates but beads don't seat
Solutions:
- Remove valve core (faster inflation)
- Use ratchet strap around center
- Bounce/shake tire while inflating
- Ensure tire in rim drop center
- Add more lubricant
- Try bead seater tool
Challenge 3: Damaging Rim
Prevention:
- Use plastic rim guards
- Apply generous lubricant
- Work slowly and carefully
- Use proper tool angles
- Practice on junk wheels first
If It Happens:
- Minor scratches: touch-up paint
- Bent rim: professional repair
- Cracked rim: replace immediately
Challenge 4: Low-Profile Tires
Extra Difficulty:
- Stiffer sidewalls
- Less room for error
- Higher damage risk
Special Techniques:
- Extra lubricant
- Work more slowly
- Consider tire spoons
- Practice more
- May need help first time
Challenge 5: TPMS Sensors
Considerations:
- Avoid damage ($50-100 replacement)
- Mark sensor position
- Be aware of location
- Don't apply force near sensor
Resetting:
- Drive 10-15 miles
- May auto-reset
- Some need manual reset
- Check owner's manual
Safety Guidelines
Personal Safety
Always Wear:
- ✅ Safety glasses (CRITICAL)
- ✅ Work gloves
- ✅ Closed-toe shoes
- ✅ Ear protection (compressor noise)
Never:
- ❌ Work under car on jack alone
- ❌ Overinflate tire (max 40 PSI while seating)
- ❌ Stand in front of inflating tire
- ❌ Force stuck components
- ❌ Work when tired/distracted
Equipment Safety
Tire Changer:
- Secure to floor if possible
- Check all bolts before use
- Keep hands clear of pinch points
- Use guards and shields
Air Compressor:
- Follow manufacturer guidelines
- Drain tank regularly
- Check pressure relief valve
- Keep area ventilated
- Don't exceed PSI limits
Inflating Tires:
- Use tire cage if available
- Stand to side, not in front
- Don't exceed 40 PSI initially
- Have clear escape route
- Stop if unusual sounds
Environmental Safety
Tire Disposal:
- Don't burn tires
- Take to recycling center
- Some shops take for free
- $2-5 disposal fee at most
Chemicals:
- Dispose of lubricants properly
- Don't pour down drain
- Keep away from children/pets
- Store safely
Maintenance Tips
Daily (After Each Use):
- Wipe down tire changer
- Clean lubricant residue
- Inspect for damage
- Drain compressor tank
- Organize tools
Weekly (Active Use):
- Lubricate moving parts
- Check air hose connections
- Test all functions
- Clean work area
- Inspect tires for damage
Monthly:
- Deep clean equipment
- Tighten all bolts
- Check compressor oil
- Inspect air filter
- Replace worn parts
Annually:
- Complete equipment overhaul
- Replace wear parts
- Professional inspection
- Update supplies
- Review safety procedures
Cost-Benefit Analysis
Year 1:
Costs:
- Equipment: $1,000-1,500
- Supplies: $100-150
- Practice wheels: $40-60
- Total: $1,140-1,710
Savings:
- 2 seasonal changes × 4 tires = 8 tires
- Shop cost: $20/tire × 8 = $160
- DIY cost: $20 (supplies)
- Savings: $140
Net First Year: -$1,000 to -1,570
Year 2-3:
Costs:
- Supplies: $30-50/year
- Maintenance: $20-40/year
- Total: $50-90/year
Savings:
- $160-200/year
- Net Savings: $110-150/year
Year 5:
Cumulative:
- Total invested: $1,350-2,000
- Total saved: $800-1,000
- Break-even approaching
Year 10:
Cumulative:
- Total invested: $1,600-2,400
- Total saved: $1,600-2,000
- ROI achieved
- Bonus: Have valuable skill
Additional Value:
Non-Financial Benefits:
- Convenience (no appointments)
- Skill development
- Self-sufficiency
- Emergency preparedness
- Help friends/family
- Potential side income
Tips for Success

Learning Phase:
- Watch everything (20+ videos)
- Read manuals thoroughly
- Practice on junk wheels (3-5 tires)
- Ask questions in forums
- Go slowly - speed comes later
- Document your process (photos/notes)
Efficiency Tips:
- Prepare everything first
- Use plenty of lubricant
- Work methodically, not fast
- Keep workspace organized
- Do all 4 tires same day
- Clean as you go
Quality Tips:
- Don't rush - patience pays
- Check work twice
- Use torque wrench (always)
- Inspect carefully
- Test drive cautiously
- Re-check after 50 miles
When to Get Help:
Consider professional help for:
- First tire change
- Run-flat tires
- Damaged/bent rims
- Very old/stuck tires
- Low-profile performance tires
- Any safety concerns
No shame in:
- Taking wheels to shop for balancing
- Asking experienced friend
- Paying for difficult tires
- Learning gradually
Conclusion
DIY tire changing is a valuable skill that saves money and provides independence. While there's a learning curve and initial investment, the long-term benefits are substantial.
Key Takeaways:
✅ Break-even: 5-8 tire changes (2-3 years) ✅ Equipment: $1,000-1,500 recommended setup ✅ Learning time: 3-5 practice tires ✅ Time per change: 45-90 minutes ✅ Annual savings: $160-240 ✅ Added value: Skill, convenience, independence
Recommended Equipment:
Best All-Around: LCTX Air-Powered Tire Changer ($599.99)
- Professional results
- Home-friendly size
- Air-powered (reliable)
- Handles 12-21" tires
- Room to grow skills
With:
- 10-gallon air compressor ($300)
- Quality hand tools ($250)
- Supplies ($150)
- Total: $1,300
Getting Started:
- Buy quality equipment (LCTX recommended)
- Watch tutorials extensively
- Practice on junk wheels
- Start with your oldest car
- Take your time
- Build confidence gradually
Ready to start saving money and gain independence? The LCTX Air-Powered Tire Changer makes DIY tire changing accessible for home mechanics.
Free Resources:
- DIY tire change checklist
- Safety guidelines PDF
- Video tutorial playlist
- Troubleshooting guide
Contact LCTX for equipment recommendations and support.


